Sub CPMK :
- Mahasiswa dapat mengetahui file-file penyusun BottomNavigationView
- Mahasiswa dapat mengedit atau menambahkan menu baru di BottomNavigation
- Mahasiswa dapat membuat aplikasi dengan menerapkan BottomNavigation
Alat dan Bahan :
- Laptop atau PC dengan Spesifikasi Prosesor minimal Corei5 dan RAM 8 GB
- Android Studio
- Android Device
Langkah Praktikum
- Buat Project baru di android studio, dengan kriteria sebagai berikut :
| Nama Project | MyBottomNavigation |
| Target & Minimal SDK | Phone and Tablet, API Level 21 |
| Tipe Activity | Bottom Navigation Activity |
| Language | Kotlin |
- Pilih template Bottom Navigation Activity untuk membuat BottomNavigationView.

Sebelum melanjutkan, cobalah menjalankan aplikasi yang baru kita buat. Tampilannya kurang lebih akan seperti gambar di bawah ini:

- Sebelum Anda mengembangkan lebih lanjut tentang BottomNavigationView, mari lihat perubahan hasil dari pembuatan template Activity dengan Bottom Navigation Activity
Buka berkas build.gradle (modul:app). Di bagian dependencies, terdapat material design library berikut:
dependencies {
    ...
    implementation 'com.google.android.material:material:1.4.0'
}
Ini menandakan bahwa komponen BottomNavigationView menjadi bagian dari material design library. Di dalamnya terdapat banyak komponen material design yang siap untuk Anda gunakan.
Selain itu, juga ada dependecies library seperti ini:
implementation 'androidx.navigation:navigation-fragment-ktx:2.3.5'
implementation 'androidx.navigation:navigation-ui-ktx:2.3.5'
Ini adalah library terbaru dari Navigation Component yang berfungsi untuk membuat NavigationUI seperti BottomNavigation dan mengatur proses transaksi antar Fragment dengan lebih mudah.
Sekarang buka satu persatu berkas xml untuk tampilan. Mulailah dari activity_main.xml:
<?xml version="1.0" encoding="utf-8"?>
<androidx.constraintlayout.widget.ConstraintLayout
    xmlns:android="http://schemas.android.com/apk/res/android"
    xmlns:app="http://schemas.android.com/apk/res-auto"
    android:id="@+id/container"
    android:layout_width="match_parent"
    android:layout_height="match_parent"
    android:paddingTop="?attr/actionBarSize">

    <com.google.android.material.bottomnavigation.BottomNavigationView
        android:id="@+id/nav_view"
        android:layout_width="0dp"
        android:layout_height="wrap_content"
        android:layout_marginStart="0dp"
        android:layout_marginEnd="0dp"
        android:background="?android:attr/windowBackground"
        app:layout_constraintBottom_toBottomOf="parent"
        app:layout_constraintLeft_toLeftOf="parent"
        app:layout_constraintRight_toRightOf="parent"
        app:menu="@menu/bottom_nav_menu" />

    <fragment
        android:id="@+id/nav_host_fragment_activity_main"
        android:name="androidx.navigation.fragment.NavHostFragment"
        android:layout_width="match_parent"
        android:layout_height="match_parent"
        app:defaultNavHost="true"
        app:layout_constraintBottom_toTopOf="@id/nav_view"
        app:layout_constraintLeft_toLeftOf="parent"
        app:layout_constraintRight_toRightOf="parent"
        app:layout_constraintTop_toTopOf="parent"
        app:navGraph="@navigation/mobile_navigation" />

</androidx.constraintlayout.widget.ConstraintLayout>
Perhatikan kode berikut ini:
<com.google.android.material.bottomnavigation.BottomNavigationView
    android:id="@+id/nav_view"
    android:layout_width="0dp"
    android:layout_height="wrap_content"
    android:layout_marginStart="0dp"
    android:layout_marginEnd="0dp"
    android:background="?android:attr/windowBackground"
    app:layout_constraintBottom_toBottomOf="parent"
    app:layout_constraintLeft_toLeftOf="parent"
    app:layout_constraintRight_toRightOf="parent"
    app:menu="@menu/bottom_nav_menu" />
Kode di atas berfungsi untuk menampilkan BottomNavigationView. Lalu bagaimana Anda bisa menambahkan item pada BottomNavigationView tersebut? Jika dilihat di dalam widget, terdapat salah satu pengaturan yakni app:menu=”@menu/bottom_nav_menu“. Yup, atribut app:menu berfungsi untuk memasukkan item-item yang ada di menu/bottom_nav_menu.xml ke dalam BottomNavigationView.
Selanjutnya mari lihat berkas bottom_nav_menu.xml di dalam folder res/menu.
<?xml version="1.0" encoding="utf-8"?>
<menu xmlns:android="http://schemas.android.com/apk/res/android">

    <item
        android:id="@+id/navigation_home"
        android:icon="@drawable/ic_home_black_24dp"
        android:title="@string/title_home" />
    <item
        android:id="@+id/navigation_dashboard"
        android:icon="@drawable/ic_dashboard_black_24dp"
        android:title="@string/title_dashboard" />
    <item
        android:id="@+id/navigation_notifications"
        android:icon="@drawable/ic_notifications_black_24dp"
        android:title="@string/title_notifications" />

</menu>
Jika dilihat sekilas, komponen dari item menu di atas mirip dengan menu yang ada di NavigationDrawer ataupun ketika Anda membuat option menu. Jadi masing-masing item tersebut minimal mempunyai atribut id, icon dan title.
Kemudian, kembali ke activity_main.xml. Perhatikan kode berikut:
<fragment
    android:id="@+id/nav_host_fragment"
    android:name="androidx.navigation.fragment.NavHostFragment"
    android:layout_width="match_parent"
    android:layout_height="match_parent"
    app:defaultNavHost="true"
    app:layout_constraintBottom_toTopOf="@id/nav_view"
    app:layout_constraintLeft_toLeftOf="parent"
    app:layout_constraintRight_toRightOf="parent"
    app:layout_constraintTop_toTopOf="parent"
    app:navGraph="@navigation/mobile_navigation" />
Di dalam layout ini terdapat komponen fragment yang berfungsi sebagai NavHostFragment, yaitu salah satu komponen dari Navigation yang berfungsi sebagai host dari fragment-fragment yang lainnya. Di sini lah letak fragment akan ditempelkan. Untuk berkas navigation graph dapat Anda lihat pada navigation/mobile_navigation.xml.
<?xml version="1.0" encoding="utf-8"?>
<navigation xmlns:android="http://schemas.android.com/apk/res/android"
    xmlns:app="http://schemas.android.com/apk/res-auto"
    xmlns:tools="http://schemas.android.com/tools"
    android:id="@+id/mobile_navigation"
    app:startDestination="@+id/navigation_home">

    <fragment
        android:id="@+id/navigation_home"
        android:name="studio.afandi.mybottomnavigation.ui.home.HomeFragment"
        android:label="@string/title_home"
        tools:layout="@layout/fragment_home" />

    <fragment
        android:id="@+id/navigation_dashboard"
        android:name="studio.afandi.mybottomnavigation.ui.dashboard.DashboardFragment"
        android:label="@string/title_dashboard"
        tools:layout="@layout/fragment_dashboard" />

    <fragment
        android:id="@+id/navigation_notifications"
        android:name="studio.afandi.mybottomnavigation.ui.notifications.NotificationsFragment"
        android:label="@string/title_notifications"
        tools:layout="@layout/fragment_notifications" />
</navigation>
Dapat dilihat di dalam Navigation Graph ada tiga destination fragment sesuai dengan tiga id yang ada di menu Bottom Navigation, yaitu navigation_home, navigation_dashboard, navigation_notifications.
Lalu bagaimana menerapkan Navigation tersebut pada sebuah Activity? Coba bukalah MainActivity:
val navView: BottomNavigationView = findViewById(R.id.nav_view)

val navController = findNavController(R.id.nav_host_fragment)

val appBarConfiguration = AppBarConfiguration.Builder(
    R.id.navigation_home, R.id.navigation_dashboard, R.id.navigation_notifications
).build()

setupActionBarWithNavController(navController, appBarConfiguration)
navView.setupWithNavController(navController)
AppBarConfiguration berisi kumpulan id yang ada di dalam menu BottomNavigation, khususnya yang ingin dikonfigurasi AppBar-nya supaya berbentuk Menu. Jika id tidak Anda tambahkan di sini, maka AppBar akan menampilkan tanda panah kembali. Kemudian setupActionBarWithNavController digunakan untuk mengatur judul AppBar agar sesuai dengan Fragment yang ditampilkan. Dan yang terakhir, setupWithNavController digunakan supaya Bottom Navigation menampilkan Fragment yang sesuai ketika menu dipilih.
Menambahkan Menu Baru di Bottom Navigation
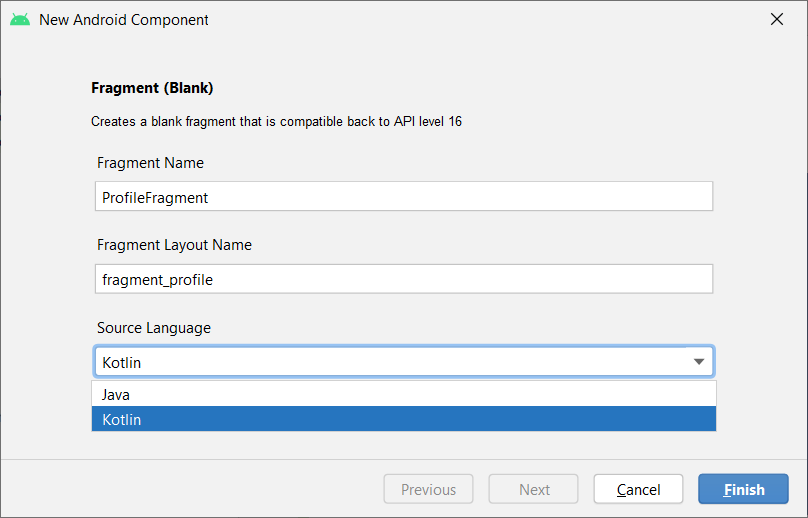
- Mari coba menambahkan satu menu lagi di BottomNavigation. Pertama buat Fragment baru dengan cara klik kanan package utama Anda → pilih new → Fragment → Fragment(Blank) → masukan nama fragment tersebut → selanjutnya pilih Finish. Berikut ini adalah salah satu contoh tampilan dari pembuatan fragment tersebut:

Membuat Prrofile Fragment
- Selanjutnya Anda ubah tampilan di fragment_profile.xml supaya sesuai dengan tampilan menu lainnya.
<?xml version="1.0" encoding="utf-8"?>
<androidx.constraintlayout.widget.ConstraintLayout xmlns:android="http://schemas.android.com/apk/res/android"
    xmlns:tools="http://schemas.android.com/tools"
    android:layout_width="match_parent"
    android:layout_height="match_parent"
    xmlns:app="http://schemas.android.com/apk/res-auto"
    tools:context=".ProfileFragment">

    <TextView
        android:id="@+id/text_profile"
        android:layout_width="match_parent"
        android:layout_height="wrap_content"
        android:layout_marginStart="8dp"
        android:layout_marginTop="8dp"
        android:layout_marginEnd="8dp"
        android:text="This is profile fragment"
        android:textAlignment="center"
        android:textSize="20sp"
        app:layout_constraintBottom_toBottomOf="parent"
        app:layout_constraintEnd_toEndOf="parent"
        app:layout_constraintStart_toStartOf="parent"
        app:layout_constraintTop_toTopOf="parent" />

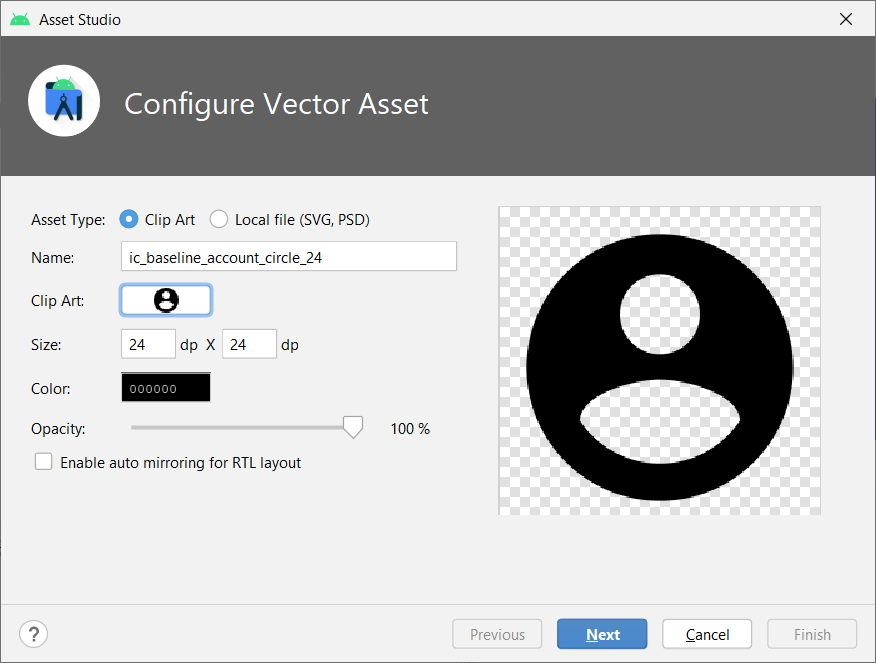
</androidx.constraintlayout.widget.ConstraintLayout>- Kemudian tambahkan icon dengan cara klik kanan pada folder drawable → pilih new → pilih Vector Asset. Kemudian pada Clip Art cari icon dengan nama account_circle. Lalu Klik Next dan Finish.

Menambah Icon Baru
- Kemudian tambahkan menu baru di menu/bottom_nav_menu.xml dengan kode berikut:
<?xml version="1.0" encoding="utf-8"?>
<menu xmlns:android="http://schemas.android.com/apk/res/android">

    <item
        android:id="@+id/navigation_home"
        android:icon="@drawable/ic_home_black_24dp"
        android:title="@string/title_home" />

    <item
        android:id="@+id/navigation_dashboard"
        android:icon="@drawable/ic_dashboard_black_24dp"
        android:title="@string/title_dashboard" />

    <item
        android:id="@+id/navigation_notifications"
        android:icon="@drawable/ic_notifications_black_24dp"
        android:title="@string/title_notifications" />

    <item
        android:id="@+id/navigation_profile"
        android:icon="@drawable/ic_account_circle_black_24dp"
        android:title="@string/title_profile" />

</menu>
Jangan lupa untuk menambahkan String baru di res → values → strings.xml
<resources>
    <string name="app_name">MyBottomNavigation</string>
    <string name="title_home">Home</string>
    <string name="title_dashboard">Dashboard</string>
    <string name="title_notifications">Notifications</string>
    <string name="title_profile">Profile</string>

    <!-- TODO: Remove or change this placeholder text -->
    <string name="hello_blank_fragment">Hello blank fragment</string>
</resources>- Selanjutnya tambahkan menu tersebut ke Navigation Component pada navigation → mobile_navigation.xml
<?xml version="1.0" encoding="utf-8"?>
<navigation xmlns:android="http://schemas.android.com/apk/res/android"
    xmlns:app="http://schemas.android.com/apk/res-auto"
    xmlns:tools="http://schemas.android.com/tools"
    android:id="@+id/mobile_navigation"
    app:startDestination="@+id/navigation_home">

    <fragment
        android:id="@+id/navigation_home"
        android:name="studio.afandi.mybottomnavigation.ui.home.HomeFragment"
        android:label="@string/title_home"
        tools:layout="@layout/fragment_home" />

    <fragment
        android:id="@+id/navigation_dashboard"
        android:name="studio.afandi.mybottomnavigation.ui.dashboard.DashboardFragment"
        android:label="@string/title_dashboard"
        tools:layout="@layout/fragment_dashboard" />

    <fragment
        android:id="@+id/navigation_notifications"
        android:name="studio.afandi.mybottomnavigation.ui.notifications.NotificationsFragment"
        android:label="@string/title_notifications"
        tools:layout="@layout/fragment_notifications" />

    <fragment
        android:id="@+id/navigation_profile"
        android:name="studio.afandi.mybottomnavigation.ProfileFragment"
        android:label="@string/title_profile"
        tools:layout="@layout/fragment_profile" />
</navigation>- Selanjutnya supaya AppBar pada fragment profile memiliki behaviour yang sesuai dengan Bottom Navigation, tambahkan id tersebut di AppConfiguration yang ada di MainActivity.
override fun onCreate(savedInstanceState: Bundle?) {
    super.onCreate(savedInstanceState)
    setContentView(R.layout.activity_main)
    ...
    val appBarConfiguration = AppBarConfiguration.Builder(
        R.id.navigation_home, R.id.navigation_dashboard, R.id.navigation_notifications, R.id.navigation_profile
    ).build()
    ...
}- Jika tidak terjadi error, silahkan running program. Hasil akhir dari program adalah sebagai berikut :


